Wednesday, January 6, 2010

Setting up Mobicents JAIN SLEE Server's SIP11 RA in clustered and load balanced environment

What we are trying to demonstrate is, running the sip11 resource adaptor in clustered and load balanced environment within Mobicents JAINSLEE server. How we will achieve it is, by running two instances of the Mobicents server on same machine and using the sip-balancer tool. How exactly we can do this is, as follows:

Requirements:

1. JBoss AS 5.1.0.GA
2. sip11 RA from trunk (revision 9249)
3. sip-balancer from trunk (revision 9250)

The load balancing scenario which this setup fits in is:
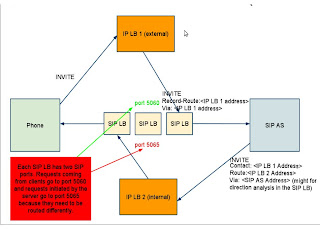


Steps given below:

1. Create a copy of "all" server node in JBoss AS, rename it to say, "all2"

2. Go to /jboss-5.1.0.GA/server/all2/conf/bindingservice.beans/META-INF, and make following changes in bindings-jboss-beans.xml:
  • Bean - ServiceBindingManagementObject's parameter is to be changed to point to the next port, instead of the default one. Change ${jboss.service.binding.set:ports-default} to
    ${jboss.service.binding.set:ports-01}
3. This step has got nothing to do with Mobicents server. However, JBoss Messaging Service cribs about the peer-ID not being unique since we are using same machine with two nodes.
Go to JBoss/jboss-5.1.0.GA/server/all2/deploy/messaging
  • Change "messaging-service.xml" to allocate unique peer id. MBean ServerPeer's ServerPeerID must be given a new value instead of 0 -
    ${jboss.messaging.ServerPeerID:1}
4. Edit sip11 RA's "du/src/main/resources/META-INF/deploy-config.xml" to specify the PORT property, to be anything other than 5060, as that's the port for your External IP Load Balancer. So, say we opt it to be 5070.
Further, uncomment the BALANCERS and OUTBOUND_PROXY properties from the same file.

Now your file should look like this:

< deploy-config >

< ra-entity resource-adaptor-id=
"ResourceAdaptorID[name=JainSipResourceAdaptor,vendor=net.java.slee.sip,version=1.2]" name="SipRA" >

< properties >

< property name="javax.sip.PORT" type="java.lang.Integer" value="5070" / >

< property name="org.mobicents.ha.javax.sip.LoadBalancerHeartBeatingServiceClassName" type="java.lang.String" value="org.mobicents.ha.javax.sip.LoadBalancerHeartBeatingServiceImpl" / >

< property name="org.mobicents.ha.javax.sip.BALANCERS" type="java.lang.String" value="127.0.0.1:5060" / >

< property name="javax.sip.OUTBOUND_PROXY" type="java.lang.String" value="127.0.0.1:5065" / >

< /properties >
< ra-link name="SipRA">
< /ra-entity >


5. After setting the JBOSS_HOME to point to your JBoss AS, in your command prompt. Build the RA:
mvn install -Dnode=all

6. The DU.jar would be deployed in JBoss/jboss-5.1.0.GA/server/all/server/default/deploy
Copy it from there and paste it in, JBoss/jboss-5.1.0.GA/server/all/deploy
Paste it in "all2" node as well: JBoss/jboss-5.1.0.GA/server/all2/deploy, edit deploy-config.xml in this jar, to set the PORT property to port number: 5080 (anything other than 5060, the port of external LB and 5070, the port of sip11 RA in "all" node)

7. Build sip-balancer tool using "mvn install"

8. In target thus created, add "lb.properties" file. It should look like this:
host=127.0.0.1
internalPort=5065
externalPort=5060
#JSIP stack configuration
javax.sip.STACK_NAME = SipBalancerForwarder
javax.sip.AUTOMATIC_DIALOG_SUPPORT = off
// You need 16 for logging traces. 32 for debug + traces.
// Your code will limp at 32 but it is best for debugging.
gov.nist.javax.sip.TRACE_LEVEL = 32
gov.nist.javax.sip.DEBUG_LOG = logs/sipbalancerforwarderdebug.txt
gov.nist.javax.sip.SERVER_LOG = logs/sipbalancerforwarder.xml
gov.nist.javax.sip.THREAD_POOL_SIZE = 64
gov.nist.javax.sip.REENTRANT_LISTENER = true

9. Start the balancer by following command in target directory:

java -jar sip-balancer-1.0.BETA10-
SNAPSHOT-jar-with-dependencies.jar -mobicents-balancer-config=lb.properties

10. Start the JBoss nodes
"all" and "all2" by,
./run.sh -c all -b 127.0.0.1

Its good to go now. They are clustered, as well as load balanced :)

Thursday, July 16, 2009

OpenIMSCore Installation on Ubuntu 9.04

Lets try and keep it as simple as possible.

Please follow the steps below to configure OpenIMSCore on localhost, later steps will be listed to switch between localhost and a specific IP address:

Prerequisites:

a. libxml2 (with development)
b. libmysql (with development)
c. bind9
d. bison
e. flex
f. mysql-server
g. ant
h. make
i. jdk1.5
j. gcc3/4


1. Go to / directory through command prompt and

mkdir opt
cd opt
mkdir OpenIMSCore
cd OpenIMSCore
mkdir ser_ims
mkdir FHoSS

2. Change the permissions for opt folder created:

chmod 777 -R /opt

3. Check out the code for OpenIMSCore

cd /opt/OpenIMSCore/

ser_ims: sudo svn checkout http://svn.berlios.de/svnroot/repos/openimscore/ser_ims/trunk ser_ims

FHoSS: sudo http://svn.berlios.de/svnroot/repos/openimscore/FHoSS/branches/07_Dynamic_Service_Activation/

4. Configure ser_ims

cd ser_ims
sudo make install-libs all

5. Install FHoSS

cd FHoSS
ant compile deploy
cd ..

6. Mysql dumps

mysql -u root -p < style="font-family: monospace;">
mysql -u root -p < FHoSS/scripts/userdata.sql
mysql -u root -p < ser_ims/cfg/icscf.sql

7. Copy and dump the following

cp ser_ims/cfg/*.cfg .
cp ser_ims/cfg/*.xml .
cp ser_ims/cfg/*.sh .

8. Make following configuration changes:

8.1 Edit /etc/bind/named.conf by adding following zone in it:

zone "open-ims.test" {
type master;
file "/etc/bind/open-ims.dnszone";
};

8.2 Copy open-ims.dnszone file to /etc/bind/

sudo cp ser_ims/cfg/open-ims.dnszone etc/bind/

8.3 Edit /etc/resolv.conf

# Generated by NetworkManager
search open-ims.test
domain open-ims.test
nameserver 127.0.0.1

8.4 Edit etc/hosts

127.0.0.1 localhost
127.0.1.1 raziya-laptop
127.0.0.1 open-ims.test mobicents.open-ims.test ue.open-ims.test presence.open-ims.test icscf.open-ims.test scscf.open-ims.test
pcscf.open- ims.test hss.open-ims.test

# The following lines are desirable for IPv6 capable hosts
::1 localhost ip6-localhost ip6-loopback
fe00::0 ip6-localnet
ff00::0 ip6-mcastprefix
ff02::1 ip6-allnodes
ff02::2 ip6-allrouters
ff02::3 ip6-allhosts

8.5 Restart bind server:

sudo /etc/init.d/bind9 restart

9. Confirm your configuration changes by digging the domain:
dig open-ims.test (It must list 127.0.0.1 in your answer sections)

10. Start all nodes and hss:

10.1 cd opt/OpenIMSCore
10.2 ./pcscf.sh
10.3 ./scscf.sh
10.4 ./icsscf.sh
10.5 cd FHoSS/deploy
10.6 sh startup.sh

Thats about it.

Now switching from localhost to a specific IP edit all the undermentioned files, by replacing all 127.0.0.1 to your specific IP say for eg: 192.168.0.100:

1. edit /etc/resolv.conf

2. edit /etc/hosts

3. edit /etc/bind/open-ims.test

4. restart bind: sudo /edit/init.d/bind9 restart

5. check: dig open-ims.test

6. Change Nodes setting:

6.1 icscf.cfg & icscf.xml (opt/OpenIMSCore/)
6.2 pcscf.cfg & pcscf.xml
6.3 scscf.cfg & scscf.xml

7. Change FHoSS setting

7.1 DiameterPeerHSS.xml (FHoSS/deploy)
7.2 hss.properties (FHoSS/deploy)


Please feel free to comment.


Thursday, October 30, 2008

What is MUCC

MUCC, stands for MoBitE Unified Communications Central. It is unified platform for one to avail all possible value added services like:

1. Call blocking
2. Call forwarding
3. Voice Mail
4. Ring Back Tone
5. Address Book
6. Instant Messaging
7. Conferencing

Is that all? You might ask... No that's just not what MUCC is all about. It is a converged application where in you can access all these features on any device (Handhelds, Landlines, Browser, etc...), for any kind of data (viz., audio, video, text) without any hicks or loss of data. The interoperability will be absolutely smooth and hassle free.

The application has been built using technologies like:

  • JBoss Seam
  • JBoss Hibernate
  • Mobicents Media Server
  • Mobicents Server
  • SIP
We are looking forward to make MUCC IMS compliant too.

Visit www.mobite.co.in for further details.

------------------------------------------------------------------------------------------------------------------